Time!! There never seems to be enough of it. No matter what you teach or how long you’ve taught, there’s always the need for more time . Over the years I’ve discovered several ways of organizing myself and my materials that create much more efficiency and ultimately SAVE ME TIME. I’ve compiled my top seven time saving tips below.
1. Work in Batches
Each time you have a free period, have a focus. Put similar tasks together and work on them, saving different tasks for another time. For example, you decide to lesson plan- plan all your math lessons at the same time before going to a different subject. Another free period you might grade. The next period might be for making copies. Concentrating on one task helps our brain get in the routine and work more efficiently. Plus, you won’t be taking trips to the copy machine 3 times a day! Additionally, when you get a dedicated time to work (whether it’s 30 mins or 2 hours) turn off your phone, shut your door and work. One of the biggest time sucking things is small distractions that come up and get us off track.
Personally, I use Google calendar to batch my tasks. I add time in my calendar for way more than just meetings. I schedule time for responding to emails and time for informal observations. I add “tasks” to my google calendar to remind me of items I want to accomplish each day or in the week. Check out more about my google calendar in this post What I’ve Learned My First Year As An Administrator.
2. Use a Weekly Planner
Plan out your week with a to-do list. Prioritize the things that are due first. Use the weekly planner to plan out when you will accomplish each of the tasks on your to-do list (before school, during your free period, after school?) I created my own weekly planner last year by combining the freebies below. I like a combination of a printable planner and my Google Calendar. Explore both and see what works for you!
Maneuvering the Middle Teacher Planner Printable
3. Classroom Jobs
Another time saving tip is to assign daily tasks to learners so you don’t have to spend your time doing them. Change the jobs regularly to give everyone a chance to be involved. Classroom jobs not only help you, the teacher, out but they also build responsibility and learner agency! Some great classroom jobs to get started with are:
Passing out papers
Floor monitor (making sure the floor is clean)
Filing graded work (next tip)
Librarian (make sure class books are organized)
Chromebook monitor (make sure Chromebooks are returned)
4. Assign Student’s Numbers
I learned this tip my first year of teaching and absolutely love it!! First, put all your learners’ names in alphabetical order the way they are in your gradebook and then number them. Have learners write these numbers on every paper in the top corner. When you are grading work, organize the papers starting with number 1-25 (or however many learners you have). Now, it is really easy to input grades because the papers are already in order like in your gradebook. You can also easily figure out which learner didn’t turn in the assignment because that number is missing.
Go one step further and create files with each learner’s number on it. Give the stack of graded work to your classroom helper or TA and, during those few minutes each day when there isn’t anything going on, have them place the graded work into the numbered files. It will go very quickly because you already ordered the papers from 1-25. Now, instead of spending time passing back graded work, learners know they need to check their file folders every day and take home whatever is inside!!
I use a milk crate and hanging file folders to organize this in my classroom.
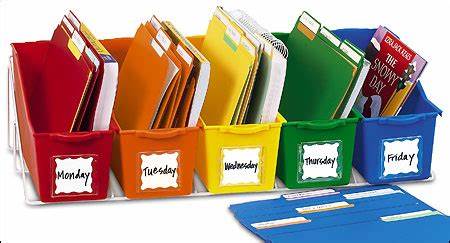
5. Create Folders or Tubs for Each Day of the Week
Identify 5 tubs or folders and mark them with each day of the week. It helps if they are different colors too! As you make copies, prepare lessons and gather the teaching aids you’ll need for the coming week, place them inside the designated folder or tub. Let’s say on Thursday you had a free period and decided to make copies of all the papers you’ll need for next week (remember timesaving tip 1 was making all your copies at once!) Instead of piling all those copies up on your desk you place the copies into the labeled folders or bins depending on what day next week you are going to use those copies in your lessons. If plans change you can always move things from one folder to another. You’ll be amazed at how much simpler life becomes when all the materials you’ll need to teach every lesson on Monday is in your Monday folder/tub! Specialist teachers or middle school/high school teachers, instead of creating a folder/tub for the days of the week you can create one for each grade level that you teach.
6. Save Everything in Folders For Next Year
This time saving tip won’t save you time right now but next year, it definitely will! Whenever you copy something make one extra copy to save in a physical file for next year (so that way you only have to photocopy and you won’t have to search for and print the resource again). Visual aids, centers and other hands-on materials can be picked up and saved to use again. As you go through the year, create a folder where you can store all the physical materials and resources you have created. Label the folder with the topic not the grade level or the Unit! This is important because maybe next year you will decide to teach the Solar System in Unit 4 instead of Unit 2. Another reason is because it helps with differentiation. For example in Math: If you organize your materials by topic: (single digit addition, double digit addition, time, measurement) then if you have a learner who needs more practice on single digit addition you can easily pull materials from that folder to differentiate. Save digital resources on your Drive using this same method (organize into topic folders).
7. Create Your Go To Templates
You can’t create every single thing from scratch, so create some general templates that can be used for multiple topics and multiple subjects and reuse those templates over and over. Templates to start with: Create Google Slides for introducing a lesson, giving instructions on an assignment, reflection, Exit ticket (quick assessment) slides or print outs, graphic organizers, checklists.

I hope you find these tips helpful and time saving! Let me know what your favorite tips are by commenting below.
Check out these posts you might like: